This article discusses how to copy and rename files in Windows PowerShell. We will start by discussing the two operations separately and then cover how to copy and rename files in one go.
You may also want to run the commands used here from a file. You can learn how to do that in the last section, “Executing a PowerShell Script (.ps1).”
Copy Files in PowerShell
This is achieved using the Copy-Item command, which has the following syntax:
Copy-Item -Path <source> -Destination <Destination> [[Other options]]
The most common options include the following:
- Path – the source path,
- Destination – the path to which we want to copy files. If this is not supplied, it defaults to the current working directory.
- Recurse – indicates that the command is doing a recursive copy. Allows the user to copy files inside subdirectories.
Example 1: Copy files from a folder recursively
|
1 2 3 |
$src = "C:\Users\kipro\OneDrive\Desktop\src\*" $dest = "C:\Users\kipro\OneDrive\Desktop\dest\" Copy-Item -Path $src -Destination $dest -Recurse |
That copies files and folders inside the src folder into the dest folder. When we issue “\*”, the contents of the src folder are copied but not the folder itself.
Example 2: Copy files to the destination if they do not exist already
In this case, we want to avoid copying files already in the destination. The -Exclude option comes in handy.
|
1 2 3 4 |
$src = "C:\Users\kipro\OneDrive\Desktop\src\*" $dest = "C:\Users\kipro\OneDrive\Desktop\dest\" $excludeDest = Get-ChildItem -Recurse $dest Copy-Item -Path $src -Destination $dest -Recurse -Exclude $excludeDest |
Get-ChildItem -Recurse $dest will list all the files in the destination folder and save them in the $excludeDest variable.
The Copy-Item is then supplied with this list through the -Exclude option so that the files already in the destination are not copied.
Renaming Files using Rename-Item in PowerShell
The Rename-Item cmdlet changes the name of a specified item without changing its content. However, the command cannot be used to move items. The command has the following syntax:
Rename-Item -Path <source> -NewName <new_name> [[Other options]]
Example 1: Renaming a file in a folder
|
1 |
Rename-Item -Path .\dest\Experiments2\marks2.csv marks4.csv |
The command will rename marks2.csv in the Experiments2 folder as marks4.csv. If marks4.csv already exists in the folder, this command will fail.
You can also use the Rename-Item command with folders.
Example 2: Rename all files in a folder
|
1 |
Get-ChildItem -Recurse .\dest -Filter *.csv | Rename-Item -NewName { $_.Name -replace "\.csv",".txt"} |
Get-ChildItem -Recurse .\dest -Filter *.csv command gets all files ending with “.csv” in the “dest” folder within the current directory. These files are then piped into the Rename-Item Command.
The Rename-Item command replaces “.csv” in the file names with “.txt”. In the end, all CSV files will be turned into text files.
The backslash on “\.csv” is used as an escape character because the item to be replaced accepts regular expressions.
$_.Name captures filenames (with extension) from the Get-ChildItem command.
Copy and Rename Files
In this section, we want to copy and rename files and/or folders using the two commands we have already discussed.
Example
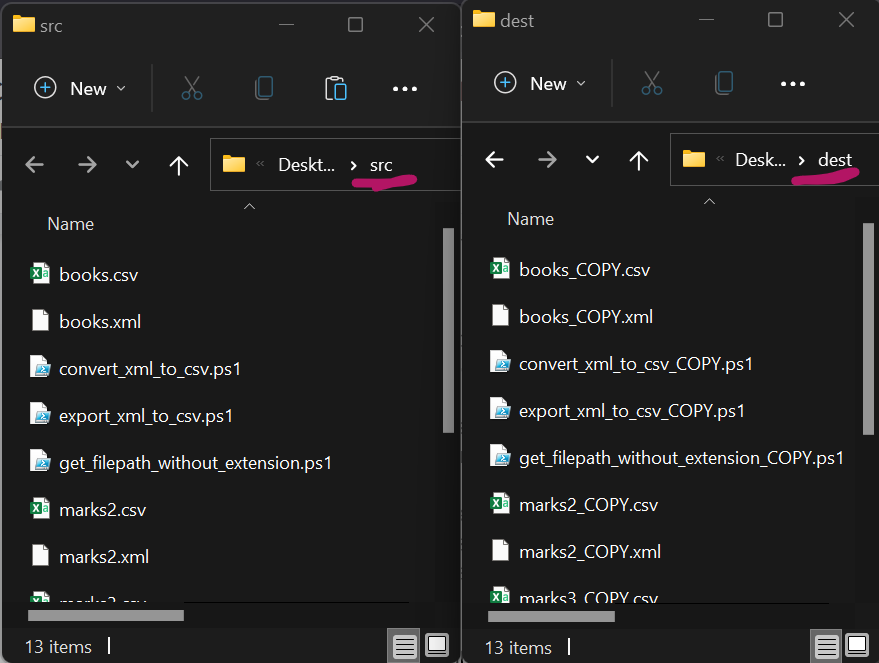
We want to copy files from the source directory and append the string “_COPY” before saving them on the destination.
We will do this by looping through files at the source and then copying them as we rename them. This can be done with the following PowerShell code.
|
1 2 3 4 5 6 7 8 9 10 11 12 13 14 |
$src = "C:\Users\kipro\OneDrive\Desktop\src" $dest = "C:\Users\kipro\OneDrive\Desktop\dest" # Get all files at the source $files = Get-ChildItem -Path $src -File # Loop through files at the source. ForEach($file in $files){ # New name will comprise of basename + "_COPY" and the original extension. # For example, marks1.txt has marks1 as Basename and ".txt" as the extension. # And the new name will be "marks1_COPY.txt" $newfile = "$($file.BaseName)_COPY$($file.Extension)" # Pipe file into Copy-Item command to be copied. # Join-Path joins the $dest with the new filename, $newfile $file | Copy-Item -Destination (Join-Path $dest $newfile) } |
When the commands above are executed directly from the PowerShell or a script, files are copied, and the string “_COPY” is appended to the filenames. See below.
Alternatively, you can copy and rename files sequentially using the code below. The commands used here have already been discussed in the previous sections.
|
1 2 3 4 5 6 |
# Copy Items to a destination $src = "C:\Users\kipro\OneDrive\Desktop\src\*" $dest = "C:\Users\kipro\OneDrive\Desktop\dest\" Copy-Item -Path $src -Destination $dest -Recurse # Rename files in the destination folder recursively Get-ChildItem -Recurse $dest| Rename-Item -NewName { $_.Name -replace $_.Name, "$($_.BaseName)_COPY$($_.Extension)"} |
Executing a PowerShell Script (.ps1)
PowerShell commands/code can be saved into a script(.ps1) and executed in Powershell.
For example, you can save any block of commands discussed previously into a file (say copy_files.ps1) and execute it by running
|
1 |
cd <path_to_directory_containing_the_script> ; .\copy_files.ps1 |
If you are inside the directory containing the script, simply run:
|
1 |
.\copy_files.ps1 |
Conclusion
This article discussed two PowerShell commands, Copy-Item and Rename-Item, used to copy and rename files. You can read more about these commands from their documentation: