Copying and renaming files in Python can be done using the shutil library. There are two functions that we will particularly use: shutil.copy2(src, dest) and shutil.copytree().
The former copies files from the src directory to dest preserving file metadata. On the other hand, shutil.copytree(src, dest) recursively copy an entire directory tree rooted at src to a directory named dest. All intermediate directories needed to contain dest will also be created by default.
Let’s work on examples of copying and renaming files in Python to understand the concepts and tools that can be used. Once you cover all six examples, you should be able to copy and rename files in any way you need.
Example 1: Copying a file from one folder to another
|
1 2 3 4 5 |
import shutil src_file = "/home/kiprono/Downloads/src/examiner2.pdf" destination = "/home/kiprono/Desktop/" shutil.copy2(src_file, destination) |
That copies the examiner2.pdf file into the Desktop
Example 2: Copy and rename the file
|
1 2 3 4 5 |
import shutil src_file = "/home/kiprono/Downloads/src/examiner2.pdf" destination = "/home/kiprono/Desktop/examiner2_feedback.pdf" shutil.copy(src_file, destination) |
The snippet above copies the file from the Downloads folder to the Desktop and renames it. Unlike shutil.copy2(), shutil.copy() does not preserve the source file metadata.
Example 3: Rename a file using shutil and os
|
1 2 3 4 5 6 7 |
import os # Renames file os.rename("/home/kiprono/Downloads/src/backup_hdd.log", "/home/kiprono/Downloads/src/hdd.log") # Moves file os.rename("/home/kiprono/Downloads/src/hdd.log", "/home/kiprono/Desktop/hdd.log") |
The first line renames the file in place, but the second line renames the file and moves it to another location, the Desktop folder. The shutil.move(src, dest) can be used for the same purpose.
Example 4: Copy and rename files in a folder
In this case, we want to copy the files from the source folder to the destination and rename each.
This method works when there’s no subdirectory inside the source folder. The comments in the code explain what each line does.
import os
import shutil

# Source directories - relative or absolute paths.
source = "./src/"
destination = "./dest/"

# A list of all files in the source directory
files_in_src = os.listdir(source)

# Iterate over all files on the source and copy them to the destination.
for file in files_in_src:
    # for example, file = exclude.txt
    # os.path.join joins the source directory to the file to get a valid source path
    #, e.g./home/kiprono/Desktop/src/exclude.txt
    src_file = os.path.join(source, file)
    # splitext() splits the basename and extension from the filename
    #, eg exclude.txt becomes (exclude, .txt)
    filename, extension = os.path.splitext(file)
    # Create a new filename with the string "_copy" added to it
    new_file = f"{filename}_copy{extension}"
    # Join the destination folder with the new filename
    dest_file = os.path.join(destination, new_file)
    # If the destination file already exists, skip it
    if os.path.exists(dest_file):
        continue
    # Copy the source file to the destination folder with the new filename
    shutil.copy(src_file, dest_file)
Output (formatted for better viewing): 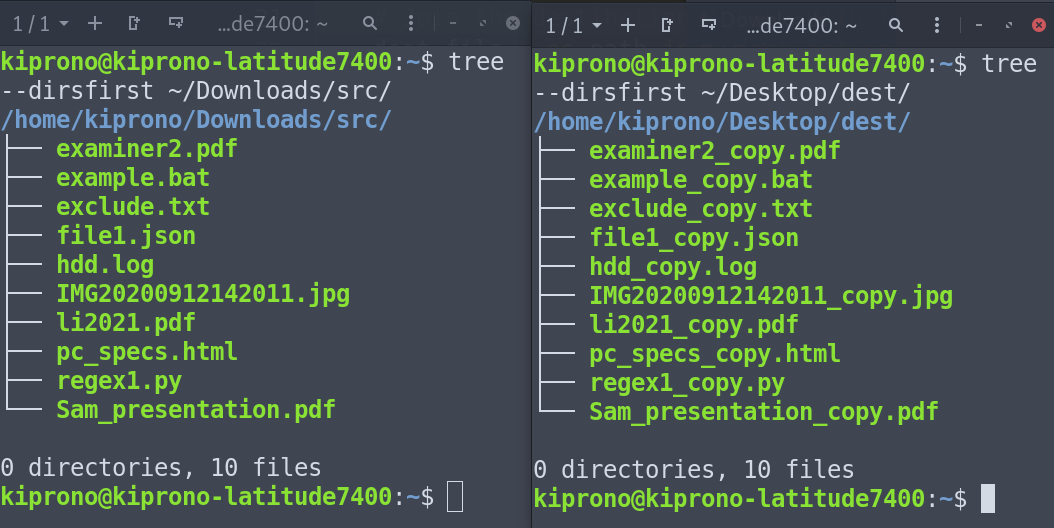
Figure : (Left) the source folder, (right) the destination folder. Note that the files at the destination have been renamed accordingly, and there’s no subdirectory inside the source.
Example 5: Copy the source folder recursively
If you want to simply copy the contents of the source folder, including its subdirectories, without renaming it, shutil.copytree(src, dest, ignore=None, copy_function=copy2, dirs_exist_ok=False, …) should do the job.
If dirs_exist_ok is false (the default) shouldn’t exist; otherwise, an error will be raised. This option ensures that files and folders in the destination are not overwritten.
If dirs_exist_ok is true, the copying operation will continue if it encounters existing directories, and files within the dest tree will be overwritten by corresponding files from the src tree.
|
1 2 3 4 5 6 7 8 9 |
import shutil # source and destination folders - you can use relative or absolute paths. source = "/home/kiprono/Downloads/src" destination = "/home/kiprono/Desktop/dest" # Copy the source folder recursively to the destination folder. # Ignoring Python files "files ending with .py", and files starting with "example". shutil.copytree(source, destination, ignore=shutil.ignore_patterns('*.py', 'example*'), dirs_exist_ok=True) |
Output (formatted for better viewing):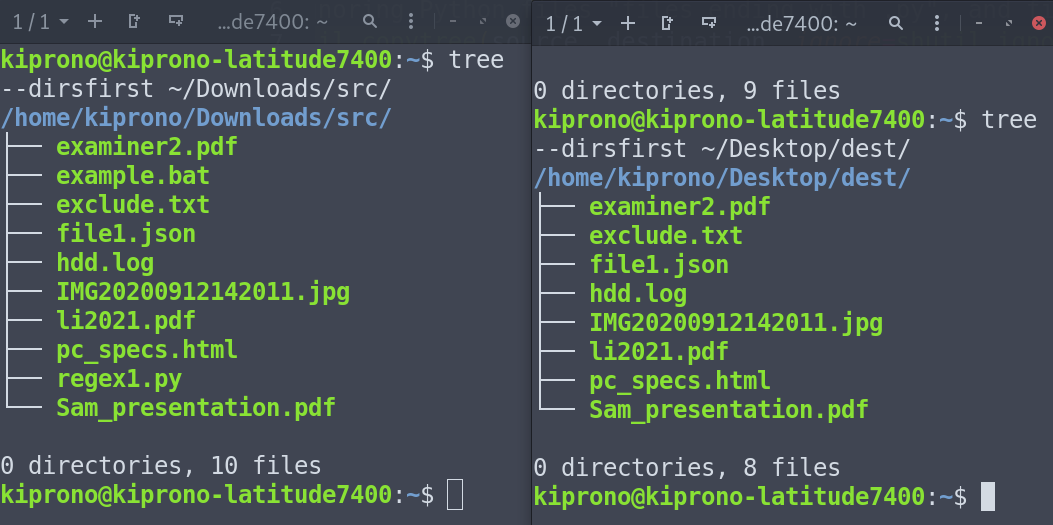
Example 6: Copy and rename files on nested directories
This example fixes the shortcomings of examples 3 and 4. This example shows how to copy and rename files on nested directories (with directories and subdirectories inside the source folder).
|
1 2 3 4 5 6 7 8 9 10 11 12 13 14 15 16 17 18 19 20 21 22 23 24 25 26 27 28 29 30 31 32 33 34 35 36 37 38 39 40 41 |
import shutil import os source = "./src/" destination = "./dest/" for dir, subdirs, files in os.walk(source): # dir will capture the source directory and all other folders inside it print("Directory:", dir) # dest_dir will replace the source path with the destination directory # This gets us the directories we need to create in the destination dest_dir = dir.replace(source, destination) # if dest_dir, a destination directory corresponding to the directory # in the source doesn't exist; create it. # os.makedirs() allows us to create nested directories # for example os.makedirs("dir1/dir2/dir3") will create three directories # dir3 inside dir2 which is inside dir1. # os.makedirs() is available in Python 3.2 and later versions. if not os.path.exists(dest_dir): os.makedirs(dest_dir) # Loop through all files in all directories in the source. # Enumerate allows us to get the index for each file. # enumerate(files, 1) means start enumerate at index 1, not the default 0. for index, file in enumerate(files, 1): # Get the index and turn it into a three-digit string using zfill(). # For example, 1 becomes 001, 2 becomes 002, 3 becomes 003 etc. three_digit_index = str(index).zfill(3) # Get the source file by joining the source folder with filename source_file = os.path.join(dir, file) # Get the basename and extension separated. e.g., test1.json becomes # ("test1", "".json") filename, extension = os.path.splitext(file) # Create a new filename with numbered files using the indices. new_file = f"{filename}_{three_digit_index}{extension}" # Join the destination directory we created earlier with the new filename destination1 = os.path.join(dest_dir, new_file) # If the destination file already exists, skip it. if os.path.exists(destination1): continue # Copy the file to the destination directory. shutil.copy2(source_file, destination1) |
Output (formatted for better viewing):
Directory: /home/kiprono/Downloads/src/
Directory: /home/kiprono/Downloads/src/evernote1
Directory: /home/kiprono/Downloads/src/evernote1/folder2
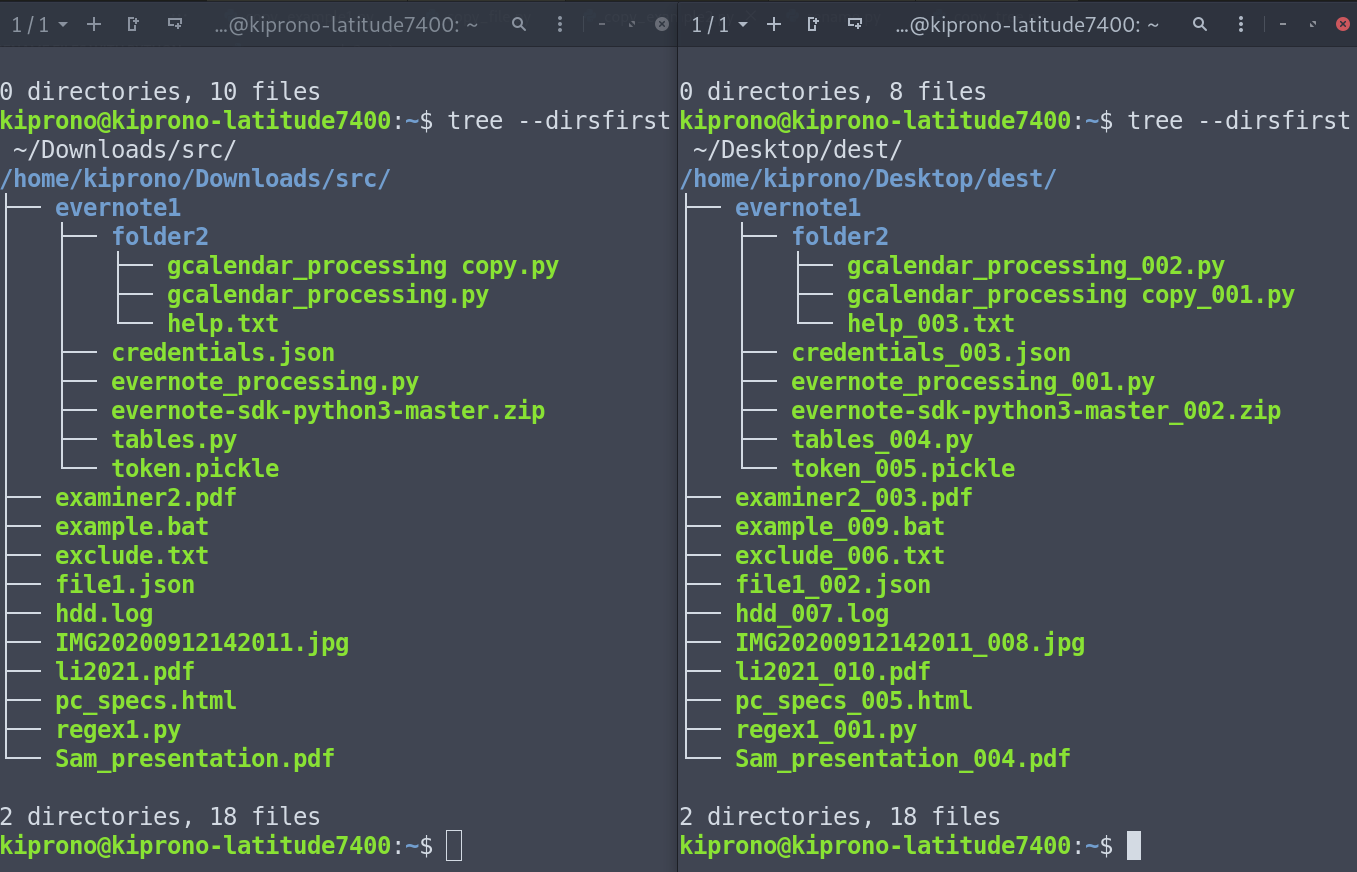
Figure : Left: Source folder with subdirectories, right: destination folder with files copied to it and renamed.
Conclusion
The examples discussed above should provide you with the tools and the understanding to copy and rename any files and folders as you might need them. You just need to get the example that fits your problem and tweak the code to match your exact need.