Image padding is adding layers of pixels to an image to modify its shape for a given purpose, as shown in the Figure below.
The original image of size (w1, h1) is padded with t pixels to the top, b to the bottom, l to the left, and r to the right. The resulting padded image is (w2, h2) in shape here w2=w1+l+r and h2=h1+t+b.
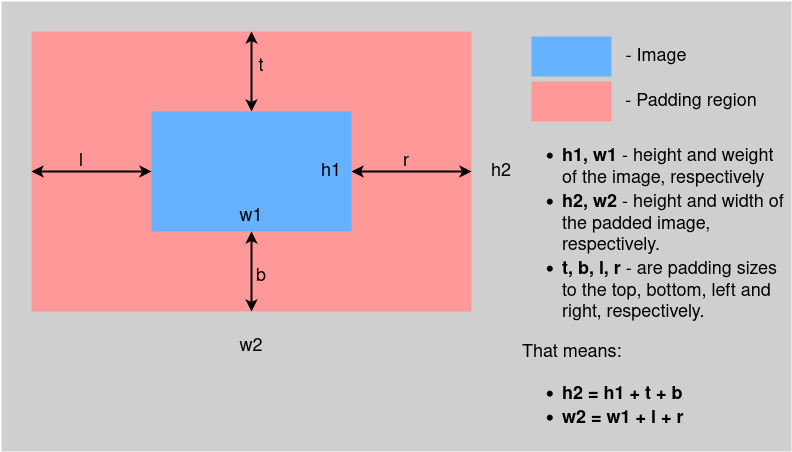 Figure 1: a pictorial representation of image padding.
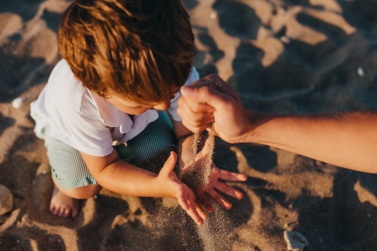
This article covers different ways of padding an image (using OpenCV, NumPy, and pillow packages). We will use the following image in our examples. (source: Unsplash)
Example 1: Padding an image using the pillow package
If you don’t have the pillow installed, you can install it with pip with the command
pip install pillow
This package performs padding in two steps. First, it creates an area that matches the desired size of the padded image and fills it with the padding color.
Secondly, it passes the original image to the area created in step 1. The region outside the pasted image becomes the padding region. Let’s see an example.
|
1 2 3 4 5 6 7 8 9 10 11 12 13 14 15 16 17 18 19 20 21 22 23 24 25 26 27 |
from PIL import Image # pip install pillow # Load image using the pillow package image = Image.open("./images/image1.jpg") def padding_image(image, padding_values, padding_color): # Define the padding values. top, bottom, left, right = padding_values # Get the image shape: (width, height) width, height = image.size # Compute the size of the padded image. How each dimension will change. width2, height2 = width + left + right, height + top + bottom # Get the full image area after padding. This will be an image filled with the # padding color. padded_image = Image.new(mode="RGB", size=(width2, height2), color=padding_color) # paste the original image to the padding area defined above. # box - tuple giving the top left corner. padded_image.paste(image, box=(left, top)) return padded_image # This is (top, bottom, left, right). padding_values = (30, 30, 0, 0) # Call the function to pad the image. padded_image = padding_image(image, padding_values, (255, 0, 255)) # Show the padded image. # padded_image.show() padded_image.show() |
Output (the padded image):

Example 2: Padding a portrait or landscape image to make it square in shape
To turn a portrait image into a squared image, we need to pad it along the width, and if we want to turn a landscape image into a square, we have to increase the height to match the width through horizontal padding.
Let’s see how to use the pillow to achieve that in coding.
|
1 2 3 4 5 6 7 8 9 10 11 12 13 14 15 16 17 18 19 20 21 22 23 24 25 26 27 28 29 30 31 32 |
from PIL import Image def pad_to_fit_square(image, padding_color=(255, 0, 255)): """ image - input image to be padded to a square, padding_color - RGB color to use for padding. """ # Get the shape of the image width, height = image.size if width == height: # if width==height, the image is already square. No padding is needed. return image elif height > width: # portrait image. # We need to increase the width; therefore, we need to create a padding of # the height (the longest side of the image). padded = Image.new(mode="RGB", size=(height, height), color=padding_color) # Paste the image to the color created above. padded.paste(image, box=(((height - width) // 2, 0))) return padded else: # landscape image # Create a square image of the size of the longest side of the image, # in this case, width. padded = Image.new(mode="RGB", size=(width, width), color=padding_color) padded.paste(image, box=(0, ((width - height) // 2))) return padded # Load the image using pillow image = Image.open("./images/image1.jpg") # Call the function to pad the image into a Square shape padded = pad_to_fit_square(image) # Show padded image. padded.show() |
Output (the square padded image):
Shape of original image:  (377, 251)
Shape of padded image:  (377, 377)
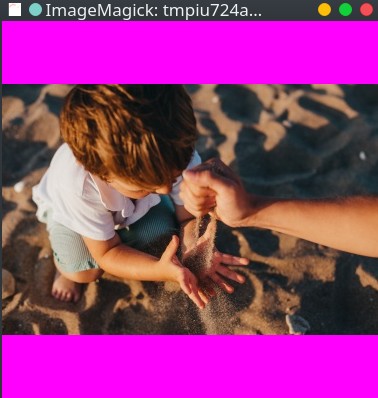
The two examples we have discussed perform padding with a solid color. The next two examples use other modes of determining the contents of padding pixels.
Example 3: Using OpenCV for image padding
You can install OpenCV using pip with this command:
pip install opencv-python
|
1 2 3 4 5 6 7 8 9 10 11 12 13 14 15 16 17 18 19 20 21 22 23 24 25 26 27 28 29 30 31 32 33 34 35 36 37 38 39 |
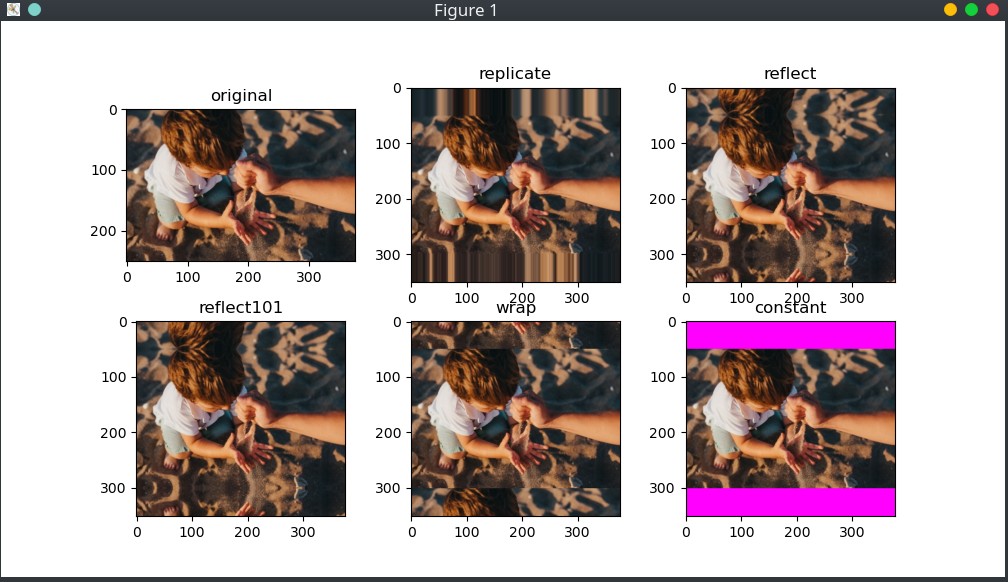
import cv2 # pip install opencv-python from matplotlib import pyplot as plt # Load the input image using OpenCV. image = cv2.imread("./images/image1.jpg", cv2.COLOR_BGR2RGB) # Padding with different border Types. # cv.BORDER_REPLICATE - The last element is replicated throughout, # like this: aaaaaa|abcdefgh|hhhhhhh - documentation replicate = cv2.copyMakeBorder( src=image, top=50, bottom=50, left=0, right=0, borderType=cv2.BORDER_REPLICATE ) # cv.BORDER_REFLECT - Border will be a mirror reflection of the border elements, # like this : fedcba|abcdefgh|hgfedcb - documentation reflect = cv2.copyMakeBorder(image, 50, 50, 0, 0, cv2.BORDER_REFLECT) # cv.BORDER_REFLECT_101 or cv.BORDER_DEFAULT - Same as above, but with a slight change, # like this : gfedcb|abcdefgh|gfedcba - documentation reflect101 = cv2.copyMakeBorder(image, 50, 50, 0, 0, cv2.BORDER_REFLECT_101) # cv.BORDER_WRAP -Something like cdefgh|abcdefgh|abcdefg - documentation. wrap = cv2.copyMakeBorder(image, 50, 50, 0, 0, cv2.BORDER_WRAP) # cv.BORDER_CONSTANT - Adds a solid color. # The "value" argument defines the BGR color to use for padding. pad_col = (255, 0, 255) # BGR color space for Blue. constant = cv2.copyMakeBorder(image, 50, 50, 0, 0, cv2.BORDER_CONSTANT, value=pad_col) ## We want to apply the six padding types to the input image. # First, we need to define a lambda function to convert each image from BGR to RGB. # By default, cv2 loads an image as BGR. convert_image = lambda x: cv2.cvtColor(x, cv2.COLOR_BGR2RGB) # Apply the conversion function to each padded image. paddings = list( map(convert_image, [image, replicate, reflect, reflect101, wrap, constant]) ) modes = ["original", "replicate", "reflect", "reflect101", "wrap", "constant"] positions = range(1, 7) # Displaying all the padded images using subplot. for mode, pos, pad in zip(modes, positions, paddings): plt.subplot(2, 3, pos) plt.title(mode) plt.imshow(pad) plt.show() |
Output:
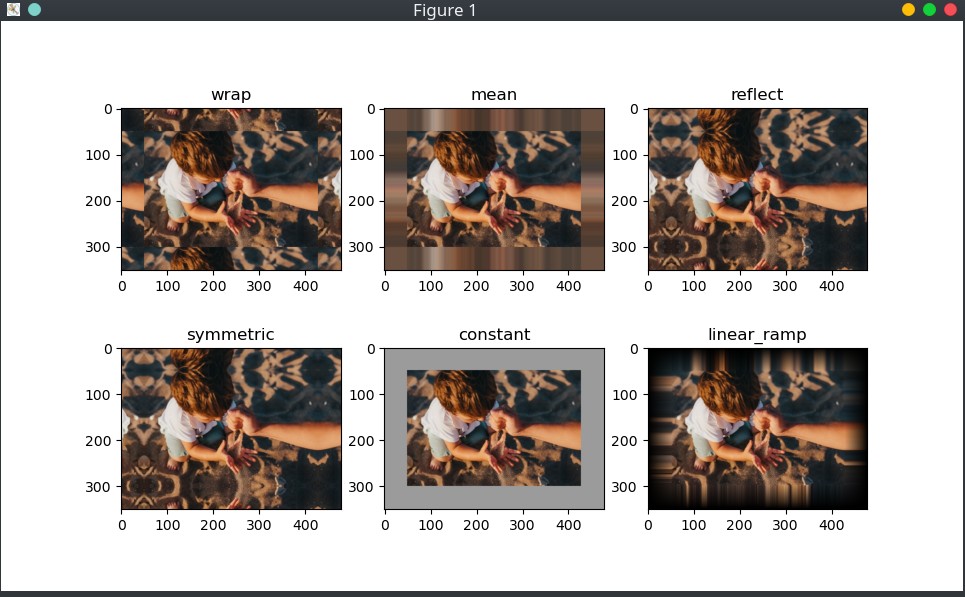
Example 4: Use numpy.pad() function to get more padding modes
If you want more options for padding mode than those given by OpenCV in example 3, consider using numpy.pad() method as shown below.
|
1 2 3 4 5 6 7 8 9 10 11 12 13 14 15 16 17 18 19 20 21 22 23 24 25 26 27 28 29 30 31 |
import cv2 import numpy as np from matplotlib import pyplot as plt # Load the image image = cv2.imread("./images/image1.jpg") # Convert the loaded BGR image into the famous RGB image = cv2.cvtColor(image, cv2.COLOR_BGR2RGB) print(image.shape) # Different modes available in np.pad() # You can check for more at: # https://numpy.org/doc/stable/reference/generated/numpy.pad.html modes = ["wrap", "mean", "reflect", "symmetric", "constant", "linear_ramp"] positions = range(1, 7) # Loop through the padding methods and apply them to the image # pad_width=((top, bottom), (left, right)) for pos, mode in zip(positions, modes): if mode == "constant": # if mode == "constant, we need to specify the color to use for padding. padded = np.pad( image, pad_width=((50, 50), (50, 50), (0, 0)), mode=mode, constant_values=(155), ) else: padded = np.pad(image, pad_width=((50, 50), (50, 50), (0, 0)), mode=mode) plt.subplot(2, 3, pos) plt.title(mode) plt.imshow(padded) plt.show() |
Output:
Conclusion
We have covered how to use OpenCV, pillow, and NumPy packages for padding images. After going through the four examples, you should be able to tweak the code examples provided to fit your purpose.