The pyodbc is an open-source Python module used to access ODBC databases. This article discusses using pyodbc to insert values into an SQL database.
Pre-requisites
Before using the pyodbc module, we need to take care of some prerequisites. They include:
Installing pyodbc
Make sure that pyodbc is installed. You can do that using pip by running the command
pip install pyodbc
Have your favorite database management system installed
For example, MySQL, SQL Server, PostgreSQL, etc. (if you want to install SQL, check the links at the end of this article)
Install ODBC driver/connector for your SQL System
You can use the links provided at the end of this post to download and install ODBC drivers for any platform.
Create a Database on your SQL
In this case, you can follow a manual for your SQL system. In my case, I will be running SQL Server on Debian 11; therefore, I can proceed as follows.
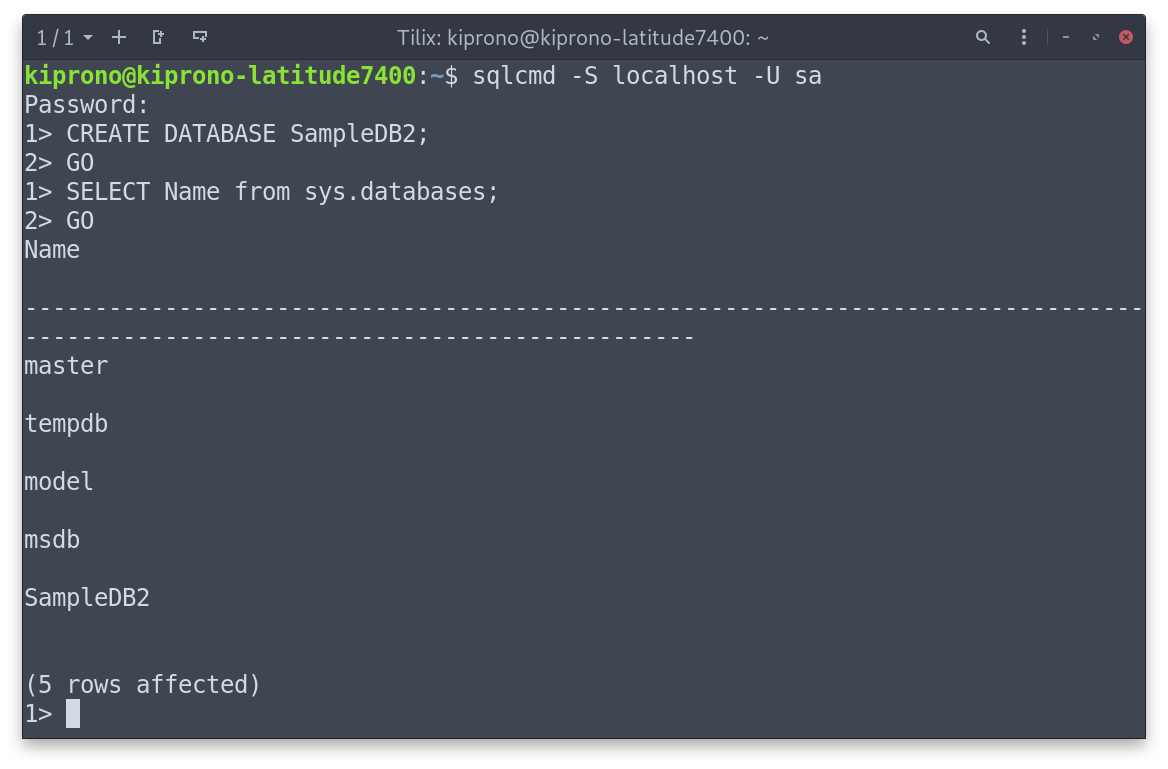
Login to the SQL Server using the following command and the password created during SQL installation.
|
1 |
sqlcmd -S localhost -U sa |
Where -S is the Server Name, and -U is the user (also created during installation).
Create SampleDB2 database by running:
|
1 |
CREATE DATABASE SampleDB2; |
Show all databases by executing the query:
|
1 |
SELECT Name from sys.databases; |
Commands are not executed automatically on SQL Server. You must type GO on a new line to execute the previous command(s). See Figure below.
Note: The SQL query can be supplied directly from the terminal using -the Q option. In that case, the following one-liner can be used to create a database from the terminal.
|
1 |
sqlcmd -S localhost -U sa -Q "CREATE DATABASE SampleDB2" |

Inserting Values into SQL
We are now ready to insert values into SQL Server using the pyodbc module. We will work on three examples to demonstrate concepts. In each example, we will:
- Establish a connection to the database using pyodbc,
- Insert values to SQL, and,
- Verify that the data was added.
Example 1
Step 1: Create a connection to SQL Server
|
1 2 3 4 5 6 7 8 9 10 |
import pyodbc # Specifying the ODBC driver, Server name, Database, Username, and Password. directly connection = pyodbc.connect('DRIVER={ODBC Driver 17 for SQL Server};\ SERVER=localhost;\ DATABASE=SampleDB2;\ UID=sa;\ PWD=password1') # Create a cursor from the connection cursor = connection.cursor() |
Since I am running locally, I will use the localhost as the Server Name. If unsure, you can use the following query to get the Server Name.
|
1 |
SELECT @@SERVERNAME |
The code above will create a connection to SampleDB2, the database we created earlier.
Step 2: Insert values into a Table in SampleDB2
First, we need to create the table that will hold our data,
|
1 2 3 4 5 6 7 8 9 |
# Create BabyNames table in the SampleDB2 database cursor.execute("""CREATE TABLE BabyNames ( Id INT PRIMARY KEY, Name VARCHAR(50), Year INT, Gender VARCHAR(2), State VARCHAR(10), Count INT); """) |
Second, insert a row into the BabyNames table
|
1 2 |
cursor.execute("""INSERT INTO BabyNames VALUES (11350, 'Emma', 2004, 'F', 'AK', 62);""") cursor.commit() |
We can also use positional parameters marked by “?” on the query as follows
|
1 2 3 4 5 |
row = (11351, "Madison", 2004, "F", "AK", 48) mySql_insert_query = """INSERT INTO BabyNames VALUES (?, ?, ?, ?, ?, ?);""" cursor.execute(mySql_insert_query, row) connection.commit() |
In cases with missing values in the rows, we need to specify column names on the query. See below.
|
1 2 3 4 5 6 |
# Some values missing - Year and Count. row2 = (11352, "Hannah", "F", "AK") mySql_insert_query2 = """INSERT INTO BabyNames (Id, Name, Gender, State) VALUES (?, ?, ?, ?);""" cursor.execute(mySql_insert_query2, row2) connection.commit() |
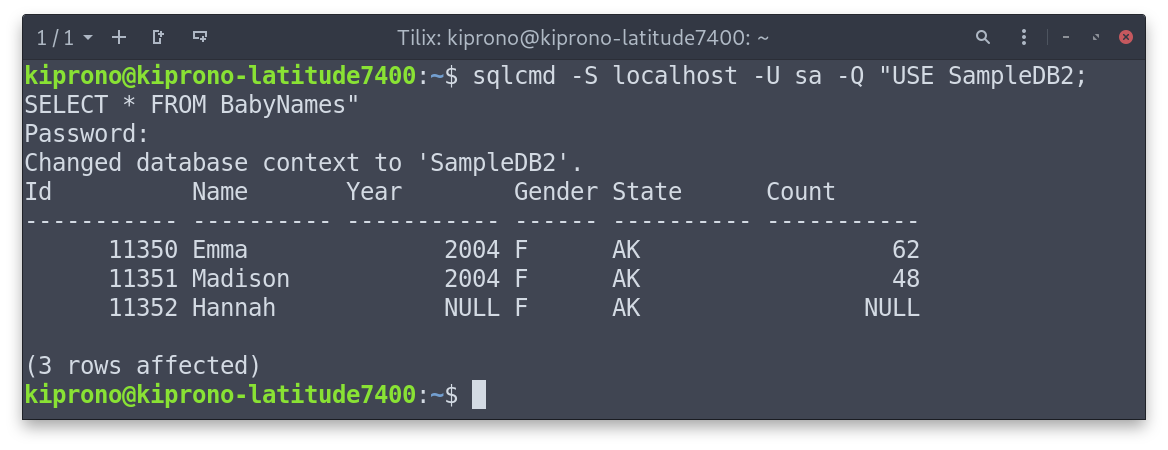
Step 3: Verify results
To do that, we need to execute these SQL commands.
|
1 2 |
USE SampleDB2 SELECT * FROM BabyNames |
The first command changes the database we want to use, and the second selects all records for all fields in the BabyNames table.

You can also run the SELECT command to view table contents within Python as follows
|
1 2 3 |
cursor.execute('''SELECT * FROM BabyNames;''') for i in cursor: print(i) |
Output:
(11350, 'Emma', 2004, 'F', 'AK', 62)
(11351, 'Madison', 2004, 'F', 'AK', 48)
(11352, 'Hannah', None, 'F', 'AK', None)
Example 2: Insert Python DataFrame into SQL table
The data to be loaded as a DataFrame and inserted into SQL are contained in bp.csv. Here is the actual content of the CSV.
patient,sex,agegrp,bp_before,bp_after
1,Male,30-45, ,153
2,Male,30-45,163,170
3,Male,30-45,153,168
4,Male,30-45,153,142
Step 1: Establish a connection to the SQL database and load CSV data
|
1 2 3 4 5 6 7 8 9 10 11 12 13 14 15 16 |
import pyodbc import pandas as pd # Specifying the ODBC driver, Server name, Database, Username, and Password. directly connection = pyodbc.connect('DRIVER={ODBC Driver 17 for SQL Server};\ SERVER=localhost;\ DATABASE=SampleDB2;\ UID=sa;\ PWD=password1') # Create a cursor from the connection cursor = connection.cursor() # Load the CSV file df = pd.read_csv("bp.csv") # This line takes care of missing values in df. # Manually convert the NaN values to None. df = df.astype(object).where(pd.notnull(df), None) |
Note: The last line in the above code snippet is critical if your data contain missing values. It is used to convert pandas NaN value into Python None. The pyodbc cursor cannot handle NaNs well.
Step 2: Create a table and insert values to it
|
1 2 3 4 5 6 7 8 9 10 11 12 13 14 |
# Create Patients2 table cursor.execute(""" CREATE TABLE Patients2 ( patient INT, sex VARCHAR(10), agegrp VARCHAR(20), bp_before INT, bp_after INT );""") # Iterate through the rows inserting values into SQL for index, row in df.iterrows(): row = list(row) SQL_Query = """INSERT INTO Patients2 (patient, sex, agegrp, bp_before, bp_after) values(?,?,?,?,?)""" cursor.execute(SQL_Query, row) connection.commit() |
Step 3: Verify that data was inserted
To do that, we need to run the query
“SELECT * FROM Patients2;” on SQL Server or Python, as shown below.
|
1 2 3 4 5 |
# Verify that Values were entered correctly. cursor.execute("""SELECT * FROM Patients2;""") for i in cursor: print(i) |
Output (truncated):
(1, 'Male', '30-45', None, 153)
(2, 'Male', '30-45', 163, 170)
(3, 'Male', '30-45', 153, 168)
(4, 'Male', '30-45', 153, 142)
Example 3: CSV data into SQL Table using pandas.DataFrame.to_sql()
This is an alternative method to what we did in Example 2. We will make use of pandas.DataFrame.to_sql() function and sqlalchemy package.
For demonstration, we will save the following data in baby_names.csv.
Id,Name,Year,Gender,State,Count
11350,Emma,2004,F,AK,62
11351,Madison, ,F,AK,48
11352,Hannah,2004,F,AK,46
11353, Grace,2004,F,AK,44
11354,Emily,2004,F, ,41
11355,Abigail,2004,F,AK,37
11356,Olivia,2004,F,AK,33
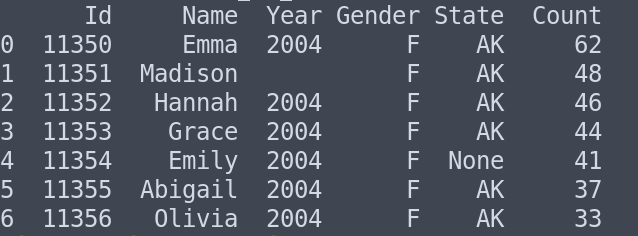
The above CSV file’s content can be sent to SQL Table using the code below.
|
1 2 3 4 5 6 7 8 9 10 11 12 13 14 15 16 17 18 19 20 21 22 23 24 |
import pandas as pd from sqlalchemy.engine import URL from sqlalchemy import create_engine # Load the CSV file df = pd.read_csv("baby_names.csv") # Creating a connection engine using sqlalchemy # Provide the Driver, Server Name, Database, User ID (UID) and Password (PWD) # on the connection_string. connection_string = "DRIVER={ODBC Driver 17 for SQL Server};\ SERVER=localhost;\ DATABASE=SampleDB2;\ UID=sa;\ PWD=password1" # Create URL connection_url = URL.create("mssql+pyodbc", query={"odbc_connect": connection_string}) # Create an actual connection engine. engine = create_engine(connection_url) # write the DataFrame to a table in the SQL database # If the "Patients2" does not exist, it is created. df.to_sql(name="Patients2" ,con=engine, index=False, if_exists='append') # Read the SQL table using pd.read_sql() to confirm that data was actually entered df2 = pd.read_sql(sql="Patients2", con=engine) print(df2) |
Output (formatted for better viewing):

Conclusion
This article discussed how to enter values into SQL using the pyodbc package. We worked on three examples – the first covered how to enter data into SQL, row by row and piece by piece. The other two examples discussed using the pyodbc module to enter CSV data.
Links you May Find Useful
- Install MySQL: https://dev.mysql.com/downloads/mysql/,
- MySQL ODBC Connector: https://dev.mysql.com/doc/connector-odbc/en/connector-odbc-installation.html,
- Installing SQL Server: https://learn.microsoft.com/en-us/sql/, and,
- SQL Server ODBC – https://learn.microsoft.com/en-us/sql/connect/odbc/microsoft-odbc-driver-for-sql-server.